Black Myth: Wukong is one of those games that really gets the adrenaline pumping, doesn’t it?
With its stunning visuals and challenging gameplay rooted in Chinese mythology, it’s no surprise that the game is getting tons of buzz. But let’s be real here: the Chapter 4 final boss? Absolute beast! That fight is no joke, and if you’ve found yourself getting stomped, don’t worry—you’re definitely not alone.
This guide is here to help you turn the tables using a little secret weapon known as the Weaver’s Needle. Let’s dive in!
What’s the Deal with Weaver’s Needle?
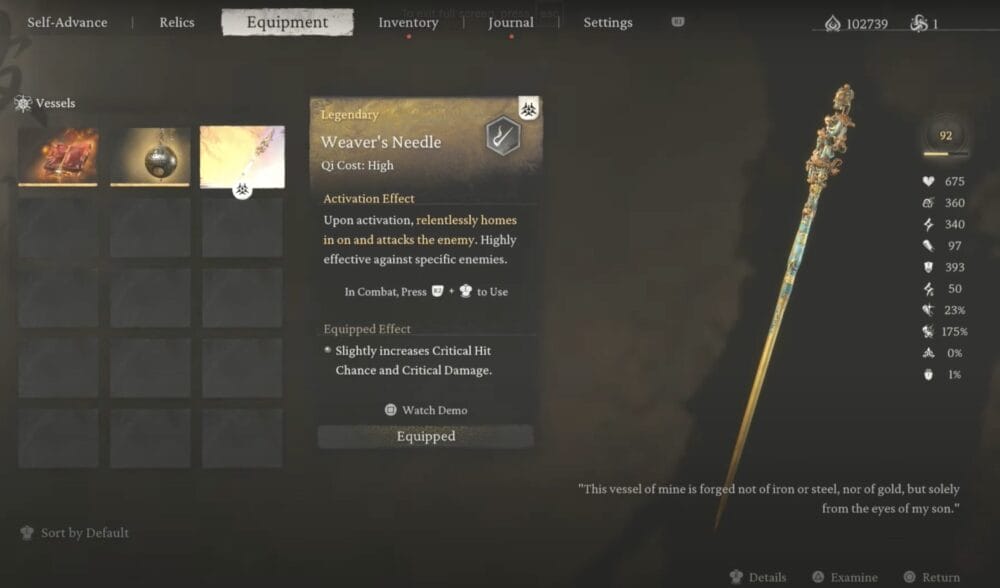
The Weaver’s Needle is one of the most powerful items in Black Myth: Wukong, and trust me, it’s going to be your best friend during this boss battle. Here’s why:

Key Features
- Activation Effect: When you trigger this bad boy, it locks onto the enemy and goes to work, attacking relentlessly. You don’t even need to aim—just let it do its thing.
- Effectiveness: It’s especially strong against bosses that have multiple phases or forms, making it perfect for the Chapter 4 final boss, which has just that!
- Equip Effect: Even just having it equipped gives you a boost—slightly increasing your critical hit chance and damage. So yeah, it’s pretty much a must-have.
How to Get the Weaver’s Needle
Now, before you can wreck shop with the Weaver’s Needle, you need to get your hands on it. It’s not something you just stumble upon—you’ve got to put in some work.
- Find Dusk Fille: The item is locked behind a secret boss named Dusk Fille in Chapter 4. Be prepared for a bit of a scavenger hunt as you search for this hidden boss.
- Beat Dusk Fille: Once you find Dusk Fille, you’ll need to take them down, which won’t be easy. Dusk Fille is no pushover, so make sure you’re well-stocked on healing items and sharpen your combat skills before jumping in.
- Claim Your Prize: After defeating Dusk Fille, the Weaver’s Needle will be yours! Completing this quest takes some time, but it’s 100% worth it for the power you’ll gain.
If you’re struggling to locate Dusk Fille or just need more detailed tips, gaming forums and community boards are great places to find extra help.
Prepping for the Big Fight
With the Weaver’s Needle now in your arsenal, it’s time to gear up for the big boss fight at the end of Chapter 4. This boss isn’t going down without a fight, but with the right prep, you’ll be ready to take them on.

What You Need Before the Fight
- Equip the Weaver’s Needle: This is a no-brainer—make sure it’s equipped before you step into the arena.
- Stock Up on Healing Items: You’re going to need a healthy supply of healing items because this boss dishes out some heavy damage.
- Know Your Abilities: Take some time to get comfortable with your character’s abilities and attack combos. You’ll need to rely on them to survive.
Phase 1: Let’s Get This Party Started
Alright, once you’re in the fight, don’t charge in guns blazing. The first phase is all about playing it smart.
- Start with Buffs: As soon as the battle begins, activate any defensive buffs or abilities that’ll give you an edge. This will help soften the blow from the boss’s early attacks.
- Study the Attack Patterns: Like any good boss fight, this one has patterns. Don’t rush in—take a minute to observe how the boss moves and attacks. This will help you figure out when to dodge and when to strike.
- Stay Defensive: Your main focus in this phase should be staying alive. Dodge, block, and wait for your moments to strike. And whatever you do, avoid those poison attacks—they’re nasty.

Phase 2: Here Comes the Transformation
Once you’ve chipped away a decent amount of the boss’s health, you’ll trigger a cutscene. This is when the boss transforms and things get a whole lot tougher.
- Be Ready for the Change: After the cutscene, the boss enters a new form and unlocks some seriously powerful attacks. This is where the real fun begins!
- Activate the Weaver’s Needle: The moment the cutscene ends, hit the right trigger and left thumbstick together to activate the Weaver’s Needle. Timing is everything—activate it right after the cutscene to dish out massive damage.
Phase 3: Weaver’s Needle to the Rescue
With the Needle now in play, here’s what you need to focus on:
- Auto-Targeting Power: The beauty of the Weaver’s Needle is that it locks onto the boss and attacks on its own. You can focus entirely on dodging and staying out of the boss’s way while the Needle chips away at its health.
- Heavy Damage: If you’ve timed it right, the Needle will deal significant damage and can even interrupt some of the boss’s most dangerous moves. This will create windows for you to go in for some extra hits.
- Stay on Your Toes: Don’t get cocky! The boss is still capable of unleashing some brutal attacks, so stay mobile and keep dodging.
Phase 4: Closing the Deal
By now, the Weaver’s Needle should have worked its magic, reverting the boss back to its earlier, weaker form. Time to bring this fight to an end.
- Keep Dodging: The boss can still pack a punch, so don’t get careless. Keep dodging those attacks and waiting for your moment to strike.
- Finish Strong: Look for openings to land the finishing blows. The boss might show signs of weakness after the Needle has disrupted its rhythm, so don’t hesitate to take advantage.
- Use Your Healing Items: If your health is running low, now’s the time to use those healing items. Just make sure you don’t waste them too early in the fight.
A Few Final Tips
- Timing is Everything: The key to victory is using the Weaver’s Needle at just the right moment—right after the cutscene when the boss transforms.
- Stay Mobile: Don’t stand still. The boss has some hard-hitting area-of-effect attacks that can catch you if you’re not careful.
- Learn from Each Attempt: If you don’t beat the boss on the first try, don’t sweat it. Each battle will teach you more about its attack patterns, and you’ll get closer to victory each time.
After defeating the formidable Chapter 4 boss, your journey in Black Myth: Wukong only gets more intense. In Chapter 5, you’ll face even greater challenges, new enemies, and unlock powerful abilities that will push your skills to the limit. Ready to take the next step? Check out our Chapter 5 guide for tips and strategies to conquer the trials ahead!


